Showing posts with label style. Show all posts

Friday, July 27, 2012

minor obsessions : full steam ahead

What. a. week. Apologies for the infrequent posting lately, but it's likely to continue as moving arrangements charge ahead. The good news is that we signed a lease on an apartment (no living in our car!), so at least the stress of apartment hunting--from across the country, no less--is over. It's also been a challenge to fit in all of the people time before the move. It seems like everyone wants to visit and hang out, & while I get so excited for visitors and enjoy having a full social calendar, it gets a bit daunting to try to schedule time to see all the people I love. It's a lot to cram in to five (!!!) weeks!

So that's why I'll only be posting a couple times a week. Deal with it. And that's why there are only four items in obsessions this week instead of the graphically pleasant quintet.


I've wanted a watch for about a year now, but have yet to find one that I really love (read: isn't lined with rhinestones). This one makes me think I should shop in the men's watch section?


A lovely winter cape...why yes, it has frequently been over 100 degrees this month.

image from here

Yes, I am one of those people who love the Olympics. This handy guide will help with your viewing. Yes, I'll probably cry while watching the inspirational pieces & medal ceremonies (their dreams are coming true!!!).


Elise from enJOY it. has been doing a blog series about the artwork in her home, and I especially love this piece.

I'm off to job hunt and tackle more on my to-do list. The good news is that I can sort & pack linens while watching the Olympics. Which means I don't have to miss Misty May-Treanor and Kerri Walsh go for another gold medal. Win-win!

Have a wonderful weekend!

Monday, July 23, 2012

DIY : bleached tie dye jeans

 In my high school Advanced Chemistry class, the pinnacle of the year was Tie Dye Day. At the end of the semester, everyone brought in various white items and tie dyed them while learning the chemistry behind the process. Most people brought in t-shirts, some got a little crazy and brought in socks. What did I bring to tie dye?

Pants. White, cotton, high waisted, slighly tapered, pants.

That style is kinda trendy now. Trust me, it was NOT trendy then.

I haven't changed my style much since high school I guess, because when I saw the tie dye denim tutorial on Honestly...WTF I instantly wanted to try it on an old pair of jeans that I had. Old habits "dye" hard (ha!).


This DIY doesn't have full instructions, because I copied the Honestly...WTF DIY Tie Dye Denim instructions almost exactly (I kinda forgot to rinse my jeans after taking them out...it didn't seem to make a difference in the jeans, but the attempted shorts have no "after" picture for a reason--gross brownish bleach stains! gross.). Also, my advice would be to wrap your garment as tightly as possible. I love the way my jeans turned out, but they are just toeing the line of too much bleach.

  I still have my tie dye pants from chemistry class--I'll have to take some photos in them sometime to show you guys!


Friday, July 6, 2012

DIY : felt flower crown


Since spring, I've been seeing so many flower crown DIYs on my favorite blogs; I knew I had to make my own. In my commitment to use the supplies I have instead of making a trip to the craft store for every DIY idea that comes my way, I decided to use some leftover felt scraps to make little felt flowers for my crown. I also used an old faux flower stem, so this project cost me zero dollars. Hooray!


You will need: scrap felt, glue gun, scissors, flower patterns (I found mine here), bendable flower stem large enough to make a ring around your head, pencil (not pictured)

Start by tracing your patterns on the felt. I made three different sizes. You don't have to trace them perfectly, I found it easy to cut out the pattern if at least the spiral was traced. Don't worry about making every petal perfect! Cut out the patterns (I also cut some simple leaves from my green felt). Wrap the stem around your head comfortably, then carefully remove it and glue together where the end joins the stem (I had some hangover that I let go past the end of the ring, but if you'd like you can snip that off).


Starting in the center of the pattern, roll up the flowers by spiraling the petals tightly together. Put a large X of glue on the back, or as much as you need to hold all of the petals securely in place. Wrap the rest of the flowers. I ended up making more flowers than pictured--I decided to make my crown asymmetrical and fuller on one side instead of a single ring around.


Attach the flowers to the stem with glue. To hold larger flowers in place, I wrapped the back petals around the stem. For smaller flowers, I simply glued them directly to the stem or to the sides of the flowers surrounding them (if they were in a cluster). Fill out your crown with the greenery.


And you have a lovely, hippy-ish flower crown that's perfect for a festival or BBQ. My brother told me I looked like I belonged at Night of a Thousand Stevies, which I took as the highest compliment. I'll definitely be wearing this in some Montana pics during our road trip.


Happy Friday & stay cool!

Wednesday, July 4, 2012

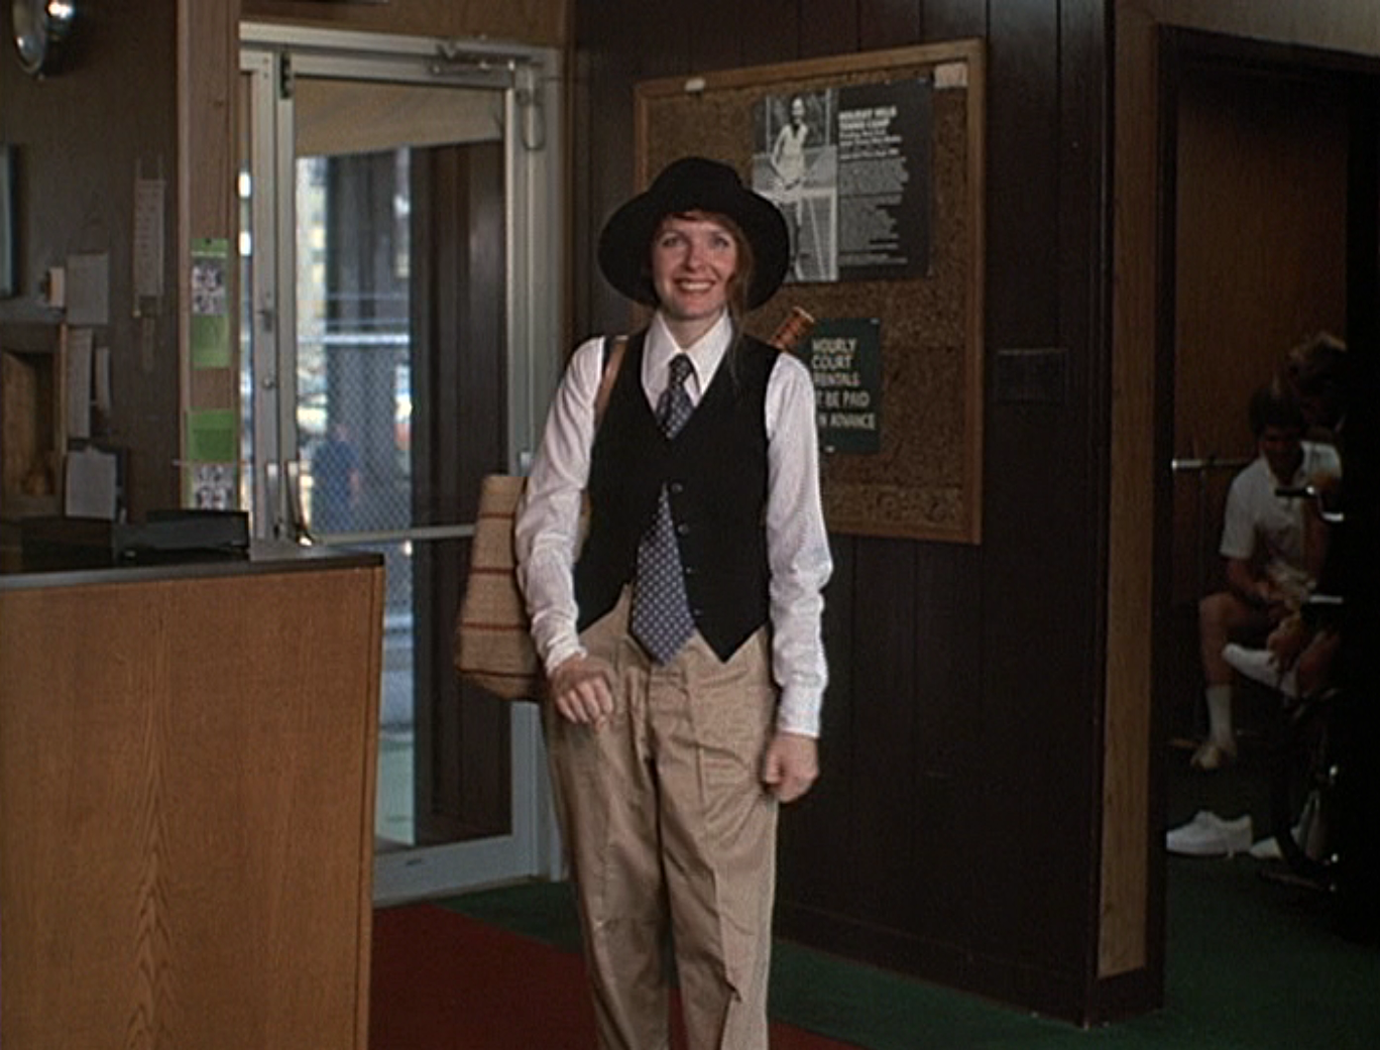
Inspired by: film's stylish american women

Happy 4th of July! To celebrate via this blog, I'm bringing you some stylish film characters that embody my favorite kind of all-American look. But don't expect poodle skirts and heels--these ladies are more of the ass-kicking variety.

from here
Louise (Susan Sarandan) & Thelma (Geena Davis), Thelma & Louise

from here
 Annie Hall (Diane Keaton), Annie Hall

from here
Toni (Jennifer Grey) & Erica (Lea Thompson), Red Dawn

from here
Stacy (Jennifer Jason Leigh) & Linda (Phoebe Cates), Fast Times at Ridgemont High

from here
 The Girl (Laurie Bird), Two-Lane Blackop

 I hope you're celebrating in style!

Friday, June 29, 2012

minor obsessions : namesake

We've come to another languid summer weekend again. Most likely, the weekend feeling will stretch well into the upcoming week since the 4th of July falls on a Wednesday. Anyone have any fun plans? I just found out my brother will be visiting me in Chicago on the 4th and am beyond excited. I'm very fortunate to have two kick-ass siblings.

Now let's talk about lions.

I love them. Their name is in my blog name. They might be my favorite animal (I am an animal lover and have many favorites, but lions are up at the top). I'm a big cat admirer in general and once took an entire disposable camera full of pictures of the same big cat at a zoo from 100 different angles. I follow a non-profit organization called Panthera that works towards wild cat conservation and runs an amazing project called Lion Guardians. Lions are brave and majestic and the males have great hair. What's not to love?


Now that's what I'm talkin' about.


I don't think I have to explain why I'd want this slouchy lion tunic.


Dane gave me this lion Spirithood for my birthday one year and I love it...way too hot to wear right now, but in the winter it definitely gets a few rotations.


This sign in the window of a pet groomer's nearby is just too funny. That kitty looks shocked and angry about his new 'do.


Maybe I've been in the city too long and am itching to see a night sky full of stars, but I've been loving all things galactic lately. This Leo constellation necklace is just lovely (although I'd have to get one for Scorpio).

Grrr!

Monday, June 18, 2012

DIY: arrowhead wire ring


Hello friends! Today I'm going to share with you how I made this simple arrowhead ring. The "arrowhead" I used is actually a spearhead that I made myself in an Archaeology class. The class spent time in the Neolithic Lab making stone tools--higher education at its finest. So, after some time banging two stones together, I emerged with this not-to-shabby spearhead. It could probably pierce something with no fur or feathers (human?) and was able to slice my finger. Don't worry, I dulled the edges for this project.


You will need: heavy scissors or wire cutter, jewelry wire (this was leftover, so I'm not sure what the thickness was--could bend with a little pressure but sturdy enough to hold your bauble in place), arrowhead/spearhead/cool gem or rock

Cut a length of wire about ten inches long. Loosely wrap the wire around the finger of your choice, leaving at least 3 inches on one side and the rest of the wire on the other. With the longer side, wrap around your finger again, weaving in and out of the first loop. Slide the loop off of your finger. Press the stone to the top of the wire and firmly wrap the stone until it feels very secure. I wrapped the wire around as well as wove through already wrapped pieces, and tried to find some natural grooves in the rock that would provide more of a grip. You can also use a dab of glue on the underside for extra hold. Tuck the ends of the wires in so they don't catch on your clothing!

I loved how this ring turned out! After all the wrapping, it ended up fitting a little snug, but I can always wear it on a different finger. Or maybe I just worked so hard, my fingers were swelling. But I'm glad I can display this spearhead I made instead of burying it in a sad little bowl on my vanity.


Tuesday, June 12, 2012

DIY: fabric covered clutch


A few years ago, a friend gave me a huge amount of purses of all kinds. I split them with my roommate and still ended up with 8 barely used bags--and some of them remained that way. This little blue clutch was one of those I "was definitely going to use". Fast forward to today, and I think I have actually carried the clutch with me no more than three times.

But with the days of summer upon us, I started to get some ideas about this clutch--mostly because I often end up sporting the oh-so-lovely purse strap sweat on hot days. It's really cute, you guys. But what's cuter is jazzing up a boring purse using a little bit of paint and fabric.

You will need: a plain clutch, acrylic paint, mod podge, paintbrush, a razor or sharp scissors, fabric

Before you begin, clean the outside of the clutch (I just used windex because the surface was vinyl). Paint any areas that will be exposed, excluding zippers. Cut your fabric down to the approximate size of the clutch--make sure to cut it larger so you have enough to wrap around! Working a few inches at a time, cover the face of the clutch with a thin layer of mod podge and carefully wrap with fabric (I used a stripe pattern, so I also had to make sure my stripes lined up with the edges--it would be much easier to use a floral or solid). Let dry for 1 hour. Using the razor or one blade of the scissors, carefully and slowly cut away excess fabric (I used a seam that ran around the outside of the purse as a guide, which helped!). Cover with a layer of mod podge and let dry for 1 hour. Touch up any painted areas that may have flaked, and once dry cover entire cluch, excluding zippers, with a layer of mod podge (this may not be necessary depending on the fabric of your clutch, but since mine was vinyl the paint didn't adhere very strongly). Let dry overnight.

Now I have a lovely new clutch with a lot more personality!

Monday, June 11, 2012

over the weekend

How was everyone's weekend? I have to brag, mine was pretty fantastic. Dane & I went down to the South Loop for brunch at a diner called White Palace (it's been featured on Diner's, Drive-In's, & Dives) that is famous for its chicken & waffles. I'm the type of person that can never decide between sweet or savory for brunch, so I'm glad this dish provides an out for me.


After brunch, we hit up the movie theater nearby for a matinee. I love matinees; there's just something transportive and magical about sitting in the dark, cool theater for a few hours, immersing yourself in a movie, and then re-emerging into the bright daylight. This matinee was doubly great because we had some free movie passes to redeem AND needed an air-conditioned escape. It was hot as the dickens outside (do people still say that? do people under 65 still say that?).

Along the way, we snapped a few photos on the bridge over the river.


I'm not much of an outfit poster (I never know how to pose!) but I wanted to share this romper I bought last fall. The weather hadn't been warm enough to wear it yet--the poor thing had to hang in my closet all winter. I love its tiny polka dots!

romper: vintage; purse: Target; ring: vintage; sunglasses: vintage
 Bring on the work week!

Friday, June 8, 2012

minor obsessions: water sign

Happy Friday dear readers! Has this week felt long to anyone else? I found myself frequently forgetting what day it was and needing the weekend as far back as Wednesday. I haven't had much time recently to browse the internet, but I have been noticing a water motif in the pictures and items I'm clicking and pinning. My astrological sign, Scorpio, is a water sign, so maybe my stars are just acting up.


I would love to jump off a small cliff into a lagoon at some point in my life...I also think a photo of me *gracefully* leaping into some clear blue water would be a great header image for this blog!


This is a sneak peak of some of the stunning artwork you will see if you head over to Cheri Lee Charlton's exhibition at Swim Cafe this month! Browse her gor-ge-ous work here!


 I would probably end up drinking this Prosecco Sangria like it was water.


 This Holding Hands print by artist Laura Berger currently sits upon our mantle, and I can't wait to give it a more permanent frame and place once we move.


 Saltwater Sandals are the more fashionable alternative to "land & sea" shoes. They're rumored to be very high quality and oh so comfortable--they also have sizes for ages 0-100 (sorry, 101 yr olds). Me want.

I have a pretty big day ahead of me tomorrow that involves brunch and a matinee movie, and a whole weekend of performances. I also have a few upcoming DIYs for you that I'm pretty excited about! TGIF people!