Showing posts with label DIY. Show all posts

Friday, December 7, 2012

christmas tree by the books


Hi everyone! I was having some problems uploading photos to blogger this week, but I seem to have it figured out. 

Despite my mini holiday decorating spree this past weekend, we don't have a proper Christmas tree up yet (either fake or real). I saw a tree made out of books on Pinterest (but can't find it anymore!) so I decided to build a book tree for our bedroom! In Chicago, our living room (exposed brick) wall had two large built in bookshelves that we loved to fill, so we have a ton of books--now, our bookshelf in the living room is completely full along a dedicated shelf in the hall cabinets--so I had plenty to build my little tree!


I didn't take any step-by-step photos, because the construction of the tree was trial and error. I divided my books into three piles--large hardcovers (like old textbooks & coffee table books) for the bottom, medium hard covers & paperbacks (like biographies & novels) for the middle, and small paperbacks (like shorter novels & plays) for the top! I first stacked the bottom books in a circular configuration, trying to layer the corners of the books to look more natural. Then, I did the same for the middle & top layers and finished with an open book on top to make a point. It took me a few tries & re-stacks to get something stable that looked good (due to the ranging thickness of the books). Once I was happy with my tree, I wound a string of lights around the "branches" and topped it with a bow!

The tree is about 2.5'--3' tall. I wanted it a little taller, but I didn't want to pull all of the books out of our living room bookshelf. I used the books we had stored in the hallway--about 35-40 in total for the tree. This is a great project for you if you have a bunch of old college textbooks and readers that you couldn't (or didn't want to) sell back!

I still want a real tree with ornaments though :)


Tuesday, December 4, 2012

pizza advent


For our advent calendar this year, Dane & I decided to try something kind of silly, kind of strange, but kind of awesome. The idea stemmed from a statement Dane once made: "I could eat pizza every day." So, to build anticipation for Christmas, we created pizza advent.

To defend myself against those of you who think this idea is unhealthy and gross, we have twenty varieties of pizza on our advent calendar. Some are the traditional, cheesy variety (pepperoni, Chicago style deep dish) but some are healthy (veggies & herbs, butternut squash, grilled fajita). A lot of these pizzas are dinners we already make--but now, they will be served on some sort of crust. The crust will change up a bit as well, and I'm looking forward to experimenting with different styles and tastes of crust.

We are also very active people and you can't tell me what to eat. So there.


To make the calendar, I simply cut triangles of white paper and decorated them in seasonal themes with markers. Then, I pinned them onto a cork board in a feathery, pine tree like manner. Can't beat that for simplicity.

Here's a rundown of the pizzas that made the list. I'll be sharing the recipes for some of the more "special" ones:

cheeseburger pizza
s'mores pizza
grilled fajita pizza
dessert pizza
King's choice (Dane picks)
Lady's choice (I pick)
calzone
breakfast pizza
leftovers
bacon & eggs (inspired by Elise's pizza)
pepperoni
taco pizza
butternut squash & caramelized onion pizza
BBQ chicken pizza
veggie & herbed cheese pizza
Chicago style deep dish (because we miss it!!!)
green chili pizza (this is the flavor we usually make when we have a regular "pizza night")
margherita
pesto pizza
buffalo chicken pizza

We put twenty pizzas on our advent calendar. I am pretty excited for this--not only do we get to eat some form of pizza every day, we also get to spend time together in the kitchen creating the recipes and save money by not eating out (since we have every meal planned until Christmas vacation on the 20th).

Did your favorite kind of pizza make the list? If not, share! I'll still need to come up with something good as my "Lady's choice" night!


Thursday, September 27, 2012

pine cone cork board

Everyone keeps trying to convince me it's fall but the forecast for the weekend in LA is 90 degrees and sunny. In fact, the sun has shone every single day since we arrived. The unchanging weather seems to alter the passage of time here--maybe that's why I can't believe it's already been three weeks (and maybe that's why the 40 yr olds here think they're 20...). I do feel like I'm missing out on changing leaves, pumpkins, and apple cider...hopefully "winter" will be more like an extended fall? This is something that is definitely going to take some getting used to.

I had these four bulletin board squares that needed a little a little jazzing up to fit into our new place. Nostalgia led me to make one into a pine cone cutout, and I love the way it turned out!

Side note: those are all of my necklaces--three were gifts and I made the other three (I learned how to make the bird's nest neck from Kinsey's DIY ) I can't remember the last time I actually bought a necklace in a store!


You will need: piece of cork board, pencil, permanent marker, strong double sided tape (for mounting), sharp scissors or exacto knife, pine cone pattern (I used this one)

Start by drawing your pattern on to the back side of the cork board (your final image will be a reverse of the pattern). You can print out your stencil & trace it, or freehand it by eyeballing a picture, like I did. Using sharp scissors or an exacto knife, carefully cut out the pieces one by one. I would advise keeping track of the placement of each piece so you don't end up with a puzzle-like jumble after all the pieces are cut out! Finally, put a small square of double sided tape on each piece and place on the wall!

My tape ended up being stickier than I thought, so I couldn't easily move the pieces after attaching them to the wall. So my pine cone turned out slightly unevenly spaced and messy, but I still love it! It adds some great texture and a touch of nature (without being as obvious as, say, a pine cone border).

Monday, July 23, 2012

DIY : bleached tie dye jeans

 In my high school Advanced Chemistry class, the pinnacle of the year was Tie Dye Day. At the end of the semester, everyone brought in various white items and tie dyed them while learning the chemistry behind the process. Most people brought in t-shirts, some got a little crazy and brought in socks. What did I bring to tie dye?

Pants. White, cotton, high waisted, slighly tapered, pants.

That style is kinda trendy now. Trust me, it was NOT trendy then.

I haven't changed my style much since high school I guess, because when I saw the tie dye denim tutorial on Honestly...WTF I instantly wanted to try it on an old pair of jeans that I had. Old habits "dye" hard (ha!).


This DIY doesn't have full instructions, because I copied the Honestly...WTF DIY Tie Dye Denim instructions almost exactly (I kinda forgot to rinse my jeans after taking them out...it didn't seem to make a difference in the jeans, but the attempted shorts have no "after" picture for a reason--gross brownish bleach stains! gross.). Also, my advice would be to wrap your garment as tightly as possible. I love the way my jeans turned out, but they are just toeing the line of too much bleach.

  I still have my tie dye pants from chemistry class--I'll have to take some photos in them sometime to show you guys!


Friday, July 6, 2012

DIY : felt flower crown


Since spring, I've been seeing so many flower crown DIYs on my favorite blogs; I knew I had to make my own. In my commitment to use the supplies I have instead of making a trip to the craft store for every DIY idea that comes my way, I decided to use some leftover felt scraps to make little felt flowers for my crown. I also used an old faux flower stem, so this project cost me zero dollars. Hooray!


You will need: scrap felt, glue gun, scissors, flower patterns (I found mine here), bendable flower stem large enough to make a ring around your head, pencil (not pictured)

Start by tracing your patterns on the felt. I made three different sizes. You don't have to trace them perfectly, I found it easy to cut out the pattern if at least the spiral was traced. Don't worry about making every petal perfect! Cut out the patterns (I also cut some simple leaves from my green felt). Wrap the stem around your head comfortably, then carefully remove it and glue together where the end joins the stem (I had some hangover that I let go past the end of the ring, but if you'd like you can snip that off).


Starting in the center of the pattern, roll up the flowers by spiraling the petals tightly together. Put a large X of glue on the back, or as much as you need to hold all of the petals securely in place. Wrap the rest of the flowers. I ended up making more flowers than pictured--I decided to make my crown asymmetrical and fuller on one side instead of a single ring around.


Attach the flowers to the stem with glue. To hold larger flowers in place, I wrapped the back petals around the stem. For smaller flowers, I simply glued them directly to the stem or to the sides of the flowers surrounding them (if they were in a cluster). Fill out your crown with the greenery.


And you have a lovely, hippy-ish flower crown that's perfect for a festival or BBQ. My brother told me I looked like I belonged at Night of a Thousand Stevies, which I took as the highest compliment. I'll definitely be wearing this in some Montana pics during our road trip.


Happy Friday & stay cool!

Monday, June 25, 2012

DIY: travel journal

My big sister earned her Master's Degree in French this spring, and since she loves to travel, I made her a cute travel journal to take with her on her adventures (it even has a pocket to hold ticket stubs and souvenir coasters!).  I wanted it to be small & durable enough to toss into a suitcase, but with some extra pizazz so she can display it in her home once it's full.


She finally got the package in the mail today, so I can post this DIY without ruining the surprise :)


You will need: a simple blank journal, various cutouts to decorate the cover (I used old stamps and pictures clipped from a National Geographic catalog), paint, Mod Podge, an envelope, embroidery floss & needle, scissors (not pictured), pretty paper (not pictured)
Paint the spine & back of the journal, or any areas that will not be covered by the collage. Once dry, paint a thin layer of Mod Podge on the front of the journal and cover with your cutouts. I also put one stamp on the back & a strip on the spine. Allow to dry for at least 15 minutes, then cover the entire journal with Mod Podge. Allow to dry for at least an hour, and use a second layer of Mod Podge if needed (the corners of the cutouts should lie flat). To make a pocket, cut the envelope in half and trace the front pocket onto your pretty paper. Cut out the shape and use the embroidery thread & needle to sew the paper onto the front pocket with big stitches--make sure you don't sew the pocket closed! Then, just use a thin layer of Mod Podge to paste the envelope half onto the inside of the back cover. Place the lower side of the envelope by the spine to prevent your items from spilling out when you pick up the journal.


Et voila! You have a cute customized travel journal to record your adventures. Happy traveling!


Monday, June 18, 2012

DIY: arrowhead wire ring


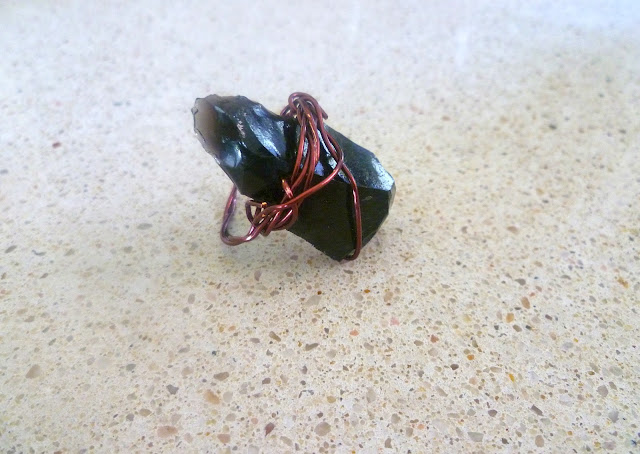
Hello friends! Today I'm going to share with you how I made this simple arrowhead ring. The "arrowhead" I used is actually a spearhead that I made myself in an Archaeology class. The class spent time in the Neolithic Lab making stone tools--higher education at its finest. So, after some time banging two stones together, I emerged with this not-to-shabby spearhead. It could probably pierce something with no fur or feathers (human?) and was able to slice my finger. Don't worry, I dulled the edges for this project.


You will need: heavy scissors or wire cutter, jewelry wire (this was leftover, so I'm not sure what the thickness was--could bend with a little pressure but sturdy enough to hold your bauble in place), arrowhead/spearhead/cool gem or rock

Cut a length of wire about ten inches long. Loosely wrap the wire around the finger of your choice, leaving at least 3 inches on one side and the rest of the wire on the other. With the longer side, wrap around your finger again, weaving in and out of the first loop. Slide the loop off of your finger. Press the stone to the top of the wire and firmly wrap the stone until it feels very secure. I wrapped the wire around as well as wove through already wrapped pieces, and tried to find some natural grooves in the rock that would provide more of a grip. You can also use a dab of glue on the underside for extra hold. Tuck the ends of the wires in so they don't catch on your clothing!

I loved how this ring turned out! After all the wrapping, it ended up fitting a little snug, but I can always wear it on a different finger. Or maybe I just worked so hard, my fingers were swelling. But I'm glad I can display this spearhead I made instead of burying it in a sad little bowl on my vanity.


Tuesday, June 12, 2012

DIY: fabric covered clutch


A few years ago, a friend gave me a huge amount of purses of all kinds. I split them with my roommate and still ended up with 8 barely used bags--and some of them remained that way. This little blue clutch was one of those I "was definitely going to use". Fast forward to today, and I think I have actually carried the clutch with me no more than three times.

But with the days of summer upon us, I started to get some ideas about this clutch--mostly because I often end up sporting the oh-so-lovely purse strap sweat on hot days. It's really cute, you guys. But what's cuter is jazzing up a boring purse using a little bit of paint and fabric.

You will need: a plain clutch, acrylic paint, mod podge, paintbrush, a razor or sharp scissors, fabric

Before you begin, clean the outside of the clutch (I just used windex because the surface was vinyl). Paint any areas that will be exposed, excluding zippers. Cut your fabric down to the approximate size of the clutch--make sure to cut it larger so you have enough to wrap around! Working a few inches at a time, cover the face of the clutch with a thin layer of mod podge and carefully wrap with fabric (I used a stripe pattern, so I also had to make sure my stripes lined up with the edges--it would be much easier to use a floral or solid). Let dry for 1 hour. Using the razor or one blade of the scissors, carefully and slowly cut away excess fabric (I used a seam that ran around the outside of the purse as a guide, which helped!). Cover with a layer of mod podge and let dry for 1 hour. Touch up any painted areas that may have flaked, and once dry cover entire cluch, excluding zippers, with a layer of mod podge (this may not be necessary depending on the fabric of your clutch, but since mine was vinyl the paint didn't adhere very strongly). Let dry overnight.

Now I have a lovely new clutch with a lot more personality!

Monday, May 21, 2012

DIY: hand-stamped placemats


When I saw Emma's table runner DIY tutorial at A Beautiful Mess, I knew I had to try their stamping technique on some items of my own. I have a set of placemats handed down to me from my Grandma that I rarely use, because a) they had an apple/country motif that doesn't really fit with my decor, and b) my table is rarely set, let alone decked out with some fancy placemats. By sprucing them up a bit, I hope to use them more often now that they fit my funky "dining" room (which is used for crafts & record-listening 90% of the time). I based my design on the cool ceramic workings at dalhaus--alas, their pieces cost slightly more than this DIY.


You will need: old placemats, cardboard cut in the shape of your stamp, glue, a wine cork, fabric paint, a paintbrush, a pencil, & a straightedge

Lay out your placemat. Since my design was symmetrical, I used my straightedge to draw a line down the center. Glue the cork to the back of the cardboard to create a handle for your stamp. Dip your stamp in some paint until it is lightly covered, and stamp out your design, "refilling" it when necessary. I wanted a light & faded look, but you can use the paintbrush to fill in your design. Let dry according to the paint bottle instructions, then, if your placemats are washable, wash on the delicate cycle or by hand.
If I did this project again, I would create multiple stamps for myself--by the last two placemats, the shape wasn't as sharp as it was in the beginning, due to the paint softening the edges of the stamp.

I really love my new placemats! Now I just need more dining room chairs to go with the two that my old roommate and I saved from a curbside dumpster. Frugality is the lesson here.