Friday, June 29, 2012

minor obsessions : namesake

We've come to another languid summer weekend again. Most likely, the weekend feeling will stretch well into the upcoming week since the 4th of July falls on a Wednesday. Anyone have any fun plans? I just found out my brother will be visiting me in Chicago on the 4th and am beyond excited. I'm very fortunate to have two kick-ass siblings.

Now let's talk about lions.

I love them. Their name is in my blog name. They might be my favorite animal (I am an animal lover and have many favorites, but lions are up at the top). I'm a big cat admirer in general and once took an entire disposable camera full of pictures of the same big cat at a zoo from 100 different angles. I follow a non-profit organization called Panthera that works towards wild cat conservation and runs an amazing project called Lion Guardians. Lions are brave and majestic and the males have great hair. What's not to love?


Now that's what I'm talkin' about.


I don't think I have to explain why I'd want this slouchy lion tunic.


Dane gave me this lion Spirithood for my birthday one year and I love it...way too hot to wear right now, but in the winter it definitely gets a few rotations.


This sign in the window of a pet groomer's nearby is just too funny. That kitty looks shocked and angry about his new 'do.


Maybe I've been in the city too long and am itching to see a night sky full of stars, but I've been loving all things galactic lately. This Leo constellation necklace is just lovely (although I'd have to get one for Scorpio).

Grrr!

Tuesday, June 26, 2012

fruit & ricotta panini two ways

So I love to cook. But the weather lately has been...shall we say..."toasty" the past few weeks. Thursday it's supposed to break 100 degrees--I don't care how much you love to cook, the thought of turning on an oven or standing near a burner when it is that hot (no A/C in this abode) is nauseating. So unless you want to eat salads & cereal for every meal the rest of the summer, you're going to need some options. These sandwiches may seem warm & comforting thanks to the melty cheese and toasted bread, but the fruit gives them just enough of a bright punch to taste refreshing.


Yep, I just used "refreshing" to describe a sandwich. I'm a rebel like that.

I made these on my little George Foreman grill, but you can also make them on a stove top like you would a grilled cheese (if you can stand the heat) or just by nuking the ingredients for, say, 15 seconds, and popping the bread in the toaster before assembling. Whatever keeps you cool.


Spicy Pineapple Ricotta Panini
2 slices of Texas Toast
2 1/2 Tbsp ricotta cheese
1/4 cup cubed pineapple (please use fresh & not that weird tasting canned stuff)
sprinkle of crushed red pepper

Spread the ricotta cheese on one slice of bread. Top with a sprinkle of red pepper & pineapple. Put the other piece of bread on top. Grill on a hot panini machine/ George Foreman grill that is liberally coated with cooking spray for 60-90 seconds (depending on how crispy you want your panini--I like mine lightly grilled, so I cooked it for 60 seconds).


Blackberry Jam & Ricotta Panini
2 slices of Texas Toast
2 1/2 Tbsp ricotta cheese
2 1/2 Tbsp blackberry jam
pinch of salt

Spread the ricotta cheese on one slice of bread. Lightly sprinkle with salt. Spread the jam on the other slice of bread, and put the two slices of bread together with the jam/ricotta kissing in the middle. Grill on a hot panini machine/ George Foreman grill that is liberally coated with cooking spray for 60-90 seconds (again, depending on how crispy you want your panini--I like mine lightly grilled, so I cooked it for 60 seconds).

Or mix it up! Use whatever jam or preserves you have on hand. I made a version with pineapple, ricotta, sliced jalapenos, and chicken breast last week. Yum.

Hope you're staying cool!

Monday, June 25, 2012

DIY: travel journal

My big sister earned her Master's Degree in French this spring, and since she loves to travel, I made her a cute travel journal to take with her on her adventures (it even has a pocket to hold ticket stubs and souvenir coasters!).  I wanted it to be small & durable enough to toss into a suitcase, but with some extra pizazz so she can display it in her home once it's full.


She finally got the package in the mail today, so I can post this DIY without ruining the surprise :)


You will need: a simple blank journal, various cutouts to decorate the cover (I used old stamps and pictures clipped from a National Geographic catalog), paint, Mod Podge, an envelope, embroidery floss & needle, scissors (not pictured), pretty paper (not pictured)

Paint the spine & back of the journal, or any areas that will not be covered by the collage. Once dry, paint a thin layer of Mod Podge on the front of the journal and cover with your cutouts. I also put one stamp on the back & a strip on the spine. Allow to dry for at least 15 minutes, then cover the entire journal with Mod Podge. Allow to dry for at least an hour, and use a second layer of Mod Podge if needed (the corners of the cutouts should lie flat). To make a pocket, cut the envelope in half and trace the front pocket onto your pretty paper. Cut out the shape and use the embroidery thread & needle to sew the paper onto the front pocket with big stitches--make sure you don't sew the pocket closed! Then, just use a thin layer of Mod Podge to paste the envelope half onto the inside of the back cover. Place the lower side of the envelope by the spine to prevent your items from spilling out when you pick up the journal.


Et voila! You have a cute customized travel journal to record your adventures. Happy traveling!


Sunday, June 24, 2012

let's go antiquing

Yes, "antiquing" does sound like an activity more suited for retirees or hipsters, and I don't consider myself either. Antiques sound old and breakable and fussy. I will watch a qualified person appraise them on television, but they don't always fit my asthetic.  I do, however, appreciate cool things ("probably because you're cool!" is what you're thinking). And I've found that a lot of places one would visit while "antiquing" contain many cool things that are not automatically associated with dust. So on a sunny Saturday, Dane & I took a little cross-town trip to the Randolph Street Market to find cool things. It was a pretty successful window shopping endeavor.


 I would love to get an old wall map of the USSR & hang it like Rachel did! A folksy Russian/Soviet influence seems to be creeping into my style lately...I wonder why...


Retro specs make me feel like a librarian.


Dane even found a great shirt for our move-- "Living in LA--Be Ready!" Apparently this t-shirt company is trying to warn us about LA's rampant violence (how else would you explain a dog owning three guns in his bullet hole-ridden living room?).


It's funny how places like this can make me think, "ooh! I need a colorful yardstick!"

I should have taken a picture of a set of 1960's swimsuits that were by far my favorite items at the market. We had so much fun browsing through all of the vintage clothes, items, knickknacks, memorabilia, handmade jewelry and furniture, that we didn't even mind waiting over 20 minutes for the bus too much.At least there was some shade.


What a perfect summer day!

Monday, June 18, 2012

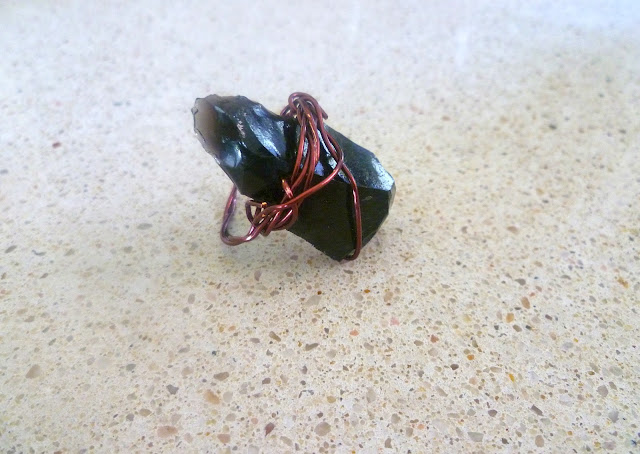
DIY: arrowhead wire ring


Hello friends! Today I'm going to share with you how I made this simple arrowhead ring. The "arrowhead" I used is actually a spearhead that I made myself in an Archaeology class. The class spent time in the Neolithic Lab making stone tools--higher education at its finest. So, after some time banging two stones together, I emerged with this not-to-shabby spearhead. It could probably pierce something with no fur or feathers (human?) and was able to slice my finger. Don't worry, I dulled the edges for this project.


You will need: heavy scissors or wire cutter, jewelry wire (this was leftover, so I'm not sure what the thickness was--could bend with a little pressure but sturdy enough to hold your bauble in place), arrowhead/spearhead/cool gem or rock

Cut a length of wire about ten inches long. Loosely wrap the wire around the finger of your choice, leaving at least 3 inches on one side and the rest of the wire on the other. With the longer side, wrap around your finger again, weaving in and out of the first loop. Slide the loop off of your finger. Press the stone to the top of the wire and firmly wrap the stone until it feels very secure. I wrapped the wire around as well as wove through already wrapped pieces, and tried to find some natural grooves in the rock that would provide more of a grip. You can also use a dab of glue on the underside for extra hold. Tuck the ends of the wires in so they don't catch on your clothing!

I loved how this ring turned out! After all the wrapping, it ended up fitting a little snug, but I can always wear it on a different finger. Or maybe I just worked so hard, my fingers were swelling. But I'm glad I can display this spearhead I made instead of burying it in a sad little bowl on my vanity.


Sunday, June 17, 2012

thanks, Dad

Took me fishing. Hand-built our treehouse. Dispensed countless historical trivia. Killed the spiders in the outhouse when we went camping, because I was afraid of them. Cooked us fried balogna sandwiches. Taught me how to shoot a free throw, swing a bat, drive a car, drive a boat, filet a fish, and pitch a tent. Let us jump on top of him and hang from his arms. Drove us on road trips to see the country. Cheered me on at every track and swim meet, basketball, softball, and soccer game. Came to see my plays and musicals and concerts. Got angry when I hit a tree with the riding lawn mower (twice). Didn't flinch when I changed my major from physics to environmental science to a double in theatre and anthropology. Played nintendo with us, and always jumped to his death down the hole that we claimed was a "secret world" (I'm sure he actually caught on to our ruse pretty quickly and still jumped).  Loves to wear Notre Dame, UWM, Tulane, and Colorado State gear to show how proud he is of his kids.

How can one man know so much about fishing, camping, basketball, baseball, swimming, running, building, fixing, history, literature, math, science, and any other category that could come up on Jeopardy?

Happy Father's Day to all fathers, and especially mine. Because of him I love being active and the outdoors. I love studying and learning and doing crossword puzzles. I love spending time with the people that mean the world to me. I may get most of my personality traits from my mom, but I get most of my interests from my dad (yes, he was even in a "play" once--he was picked out of the crowd to play King Arthur at Epcot Center, and he would  l o v e  to tell you about how much it embarrassed us kids at the time).

I love you, and thanks for everything, Dad.

Tuesday, June 12, 2012

DIY: fabric covered clutch


A few years ago, a friend gave me a huge amount of purses of all kinds. I split them with my roommate and still ended up with 8 barely used bags--and some of them remained that way. This little blue clutch was one of those I "was definitely going to use". Fast forward to today, and I think I have actually carried the clutch with me no more than three times.

But with the days of summer upon us, I started to get some ideas about this clutch--mostly because I often end up sporting the oh-so-lovely purse strap sweat on hot days. It's really cute, you guys. But what's cuter is jazzing up a boring purse using a little bit of paint and fabric.

You will need: a plain clutch, acrylic paint, mod podge, paintbrush, a razor or sharp scissors, fabric

Before you begin, clean the outside of the clutch (I just used windex because the surface was vinyl). Paint any areas that will be exposed, excluding zippers. Cut your fabric down to the approximate size of the clutch--make sure to cut it larger so you have enough to wrap around! Working a few inches at a time, cover the face of the clutch with a thin layer of mod podge and carefully wrap with fabric (I used a stripe pattern, so I also had to make sure my stripes lined up with the edges--it would be much easier to use a floral or solid). Let dry for 1 hour. Using the razor or one blade of the scissors, carefully and slowly cut away excess fabric (I used a seam that ran around the outside of the purse as a guide, which helped!). Cover with a layer of mod podge and let dry for 1 hour. Touch up any painted areas that may have flaked, and once dry cover entire cluch, excluding zippers, with a layer of mod podge (this may not be necessary depending on the fabric of your clutch, but since mine was vinyl the paint didn't adhere very strongly). Let dry overnight.

Now I have a lovely new clutch with a lot more personality!

Monday, June 11, 2012

over the weekend

How was everyone's weekend? I have to brag, mine was pretty fantastic. Dane & I went down to the South Loop for brunch at a diner called White Palace (it's been featured on Diner's, Drive-In's, & Dives) that is famous for its chicken & waffles. I'm the type of person that can never decide between sweet or savory for brunch, so I'm glad this dish provides an out for me.


After brunch, we hit up the movie theater nearby for a matinee. I love matinees; there's just something transportive and magical about sitting in the dark, cool theater for a few hours, immersing yourself in a movie, and then re-emerging into the bright daylight. This matinee was doubly great because we had some free movie passes to redeem AND needed an air-conditioned escape. It was hot as the dickens outside (do people still say that? do people under 65 still say that?).

Along the way, we snapped a few photos on the bridge over the river.


I'm not much of an outfit poster (I never know how to pose!) but I wanted to share this romper I bought last fall. The weather hadn't been warm enough to wear it yet--the poor thing had to hang in my closet all winter. I love its tiny polka dots!

romper: vintage; purse: Target; ring: vintage; sunglasses: vintage
 Bring on the work week!

Friday, June 8, 2012

minor obsessions: water sign

Happy Friday dear readers! Has this week felt long to anyone else? I found myself frequently forgetting what day it was and needing the weekend as far back as Wednesday. I haven't had much time recently to browse the internet, but I have been noticing a water motif in the pictures and items I'm clicking and pinning. My astrological sign, Scorpio, is a water sign, so maybe my stars are just acting up.


I would love to jump off a small cliff into a lagoon at some point in my life...I also think a photo of me *gracefully* leaping into some clear blue water would be a great header image for this blog!


This is a sneak peak of some of the stunning artwork you will see if you head over to Cheri Lee Charlton's exhibition at Swim Cafe this month! Browse her gor-ge-ous work here!


 I would probably end up drinking this Prosecco Sangria like it was water.


 This Holding Hands print by artist Laura Berger currently sits upon our mantle, and I can't wait to give it a more permanent frame and place once we move.


 Saltwater Sandals are the more fashionable alternative to "land & sea" shoes. They're rumored to be very high quality and oh so comfortable--they also have sizes for ages 0-100 (sorry, 101 yr olds). Me want.

I have a pretty big day ahead of me tomorrow that involves brunch and a matinee movie, and a whole weekend of performances. I also have a few upcoming DIYs for you that I'm pretty excited about! TGIF people!

Wednesday, June 6, 2012

worn out

My beloved Minnetonka moccasins have seen better days. I've had them for five years now, and I think they hold the title as the most-worn item in my closet. I've worn them in sunshine, rain, snow--you name it. I figured that Native Americans wore their moccasins in all types of weather, so I would too. I think I have to face reality, though, and lay the fringed footwear to rest. The multiple holes and flapping soles really do make them unwearable. I was thinking of maybe using the fringe for a project, but...it's been on my feet (in rain & sweltering heat, remember?) so...it's probably not a good idea. Since I'm saving every dime right now for the big move to California at the end of the summer, I'll probably have to wait until the fall to buy a new pair... :(


I'm finding my life lately a lot like these moccasins--I am feeling worn. out. I've been working really hard with the Right Brain Project theatre company on the show Marat/Sade (actual title: The Persecution and Assassination of Jean-Paul Marat as Performed by the Inmates of the Asylum of Charenton under the Direction of the Marquis de Sade...now you know why it's commonly shortened) by Peter Weiss. We open tomorrow night, so I've been spending my days working, my nights at tech/dress rehearsals, plus trying to work out an upcoming acting opportunity, keeping up with you fine folks, and trying to make the most of my summer in Chicago. It's been exhausting, but I like being busy doing the things I love. Working on creative projects makes me feel purposeful.

Want to see the trailer for my show? If you're in Chicago, I highly recommend coming to see a performance!

Monday, June 4, 2012

the easiest o-rings


What do ketchup, pickles, mushrooms, cranberries, and onion rings have in common? Did you guess, "foods Meghan hated as a kid but now enjoys"? Because that's the right answer. I won't hold it against you if you answered incorrectly; I'm still going to share my secret for delicious and easy homemade onion rings WITH a spicy dipping sauce. That's right, two recipes in one post. Everyone's a winner today!

Although I didn't like onion rings until a few years ago, I am making up for lost time. And I love to make them at home using this recipe because it's a breeze.

The secret?
Boxed Pancake Mix.

That's right, pancake mix. Not even a fancy kind--I'm talking "just add water" here. It's the best way to get a crunchy, delicious crust with the tiniest hint of sweetness. This would be classified as an "unhealthy" dish, if you were wondering. So don't eat them every day.

Onion Rings
1 large onion (I used yellow this time, but my favorite to use is red onion)
2 cups milk
about 1-1 1/2 cups prepared pancake batter (mix according to directions on the box, a.k.a add water. also, this recipe works best when batter is on the thin side)
vegetable oil

Spicy Dipping Sauce (loosely based on this recipe)
1/4 cup mayonnaise
1 Tbsp ketchup
dash of hot sauce
dash of worcestershire sauce
1/4 tsp salt
1/4 tsp black pepper
1/4 tsp garlic powder
1/4 tsp cayenne pepper

for the o-rings:
Peel & thickly slice the onion. Set aside small or non-ringlike pieces & use for a different recipe. Place rings in a shallow bowl and cover with the milk. Refrigerate for at least 2 hrs, up to overnight. On medium-high, heat enough oil to fill a small pan 1/2 inch deep. Dunk onions in batter, then carefully place into hot oil. Fry 1-2 minutes on each side, or until golden brown. Drain on paper bags or paper towels.

for the sauce:
Combine all ingredients. You can tinker with the amounts to your tastes.

Using the pancake batter gives the outside of the rings a nice crunch, but leaves the inside light & chewy. Don't worry if one side of your ring has more batter than the other (since we're cooking them one side at a time). I've found the taste and texture are not compromised by this--if it bothers you, these can also be deep fried to have a more even texture all the way around.